Welcome to the Costume Chronicles, the community scrapbook
of The Wardrobe Door. Here you can share pictures and and reports
of costumes you've made, and see the handiwork of your fellow
Narnia costumers!
Chronicles are arranged chronologically, starting with earliest
submissions. Enjoy!
Other Narnians
Father
Christmas Emily
My son, Jimmy, in Father Christmas costume I made by looking
at the sole on-line picture I was able to find before the
movie came out, at our Narnia party on 12/10/05.
This wardrobe costume was made especially for Halloween,
as well as the midnight showing of the film. I spent a day
or so on it, and was quite fond of the outcome. My supplies
were:
I talked a group of grad school friends into wearing
costumes to the premier of "The Lion, the Witch and the
Wardrobe" movie. We easily got people to agree to be
the Pevensie kids, and were rapidly running out of humanoid
characters for the number of people involved. I decided to
be a dryad in order to give the starring roles to my "not
used to dressing up" friends who were wearing copies
of the movie costumes. My dryad required a bit more imagination
and finesse because we had no pictures off of which to base
the costume. I also wanted an excuse to wear my new leather
bodice from Journeyman Leather. :-D So I was a Renaissance
dryad, not a Grecian Pauline Baynes dryad.
I loved the leaves on my face. This was my first time working
with liquid latex, and the leaves went on easily and were
so comfortable I honestly forgot I was wearing them. My shoes
were also high on my favorites list. They are basic mesh slippers
with leaves carefully sewn on to conform to the shape of the
foot. I love them, and have worn them to parties since. Very
comfortable, and had good tred, which was important since
we were walking on ice part of the evening. A third aspect
I enjoyed was my dress fabric...I found a lovely textured
brown that honestly looked and felt like soft bark. It stretched
and draped perfectly for what I wanted, and the look was great!
I hand-tacked every one of the 300+ leaves to my skirts,
and it took hours. It was fun to place them... I simply spread
my dress out on the floor, stood over it, and scattered leaves
onto it from waist-height, but tacking them down where they
fell took more than ten hours. I shed leaves from my skirts
as I walked, too. A little frustrating, knowing how much work
went into getting them onto the skirts in the first place!
But the weight of the leaves made my skirts drape nicely,
and I loved the look, so it was worth it in the end.
I struggled with the concept of what design I wanted to do
for a long time. Pauline Baynes, the illustrator for the C.S.
Lewis Narnia books, invisioned Grecian-style flowing, fluffy
robes in light colors, but that was not anything like what
I wanted to do. I wanted an Autumn costume, and that involved
Fall leaves, browns, oranges, and dusky greens. I stewed over
the design for several weeks before settling on this.
I talked a group of friends into going to to the movie premier
of "The Lion, the Witch and the Wardrobe." For that,
we needed a lion. My friend agreed. I designed the costume
to be "lion-esque" without using fake fur, and to
focus on the wig as the defining lion factor. I used tawny
yellow velveteen and deep brown corduroy for the doublet and
a rich brown cotton for the shirt.
The wig. The wig. The wig! Our Aslan's reaction when he SAW
the wig was wonderful. *grin* This was a fun costume to design,
because I had basically free reign to do whatever I wanted
with it. I very much like the "V" waist on the doublet
and the drape of the cape, as well.
The grommets used for lacing up the sides of the doublet
kept coming out and I had to keep adding interfacing to the
sides to try to support them and keep them from pulling out
of the cloth.
The wig was fun, and simple, and involved a couple of hours
of sitting on the floor, slopping neon yellow and orange hair
gel into a platinum blonde wig and fingering it through in
chunks. Orange and yellow everywhere, and all over the floor,
me, and the wig, not to mention the wig stand, my counters,
and anyone else who came through the door of my apartment!
We had a great time posing for pictures at the premier!
Aslan
Costume for Staged Production of
Narnia the Musical Theatrepirate
The following costume for Aslan was one I designed and built
for the high school production of Narnia: the Musical that
I directed.
Putting a human in the role of the Great Lion is always tricky.
I decided immediately that I didn't want to go with the typical
lion bodysuit that I have seen used in many stage productions.
I didn't want my Aslan looking like the Cowardly Lion. Instead,
I decided to do more of a representation, using colors as
my focal point, I wanted to create a wild, almost African
feel with the costume.
I used a typical robe pattern (Butterick B3648) and made
the base of the costume with some scrap fabric I found that
had a neat African print. I then cut up strips of fabric in
three different lengths and widths, which I sewed to the robe.
It was extremely time consuming, but I think the effort paid
off. I even used strips of fabric from the costumes of the
other characters in the play to sew on the robe, and I thought
that added an almost symbolic touch to the costume. I came
up with the make-up and the wig after various attempts, but
the overall affect was exactly what I had been looking for
in a staged human Aslan.
The following link is to my online
photo album. It contains various shots of the actor (with
his permission) in the Aslan costume, both during the show
itself and after the show.
Beavers
and Unicorns: Non-Human Costumes
for Narnia the Musical Stage Production Theatrepirate
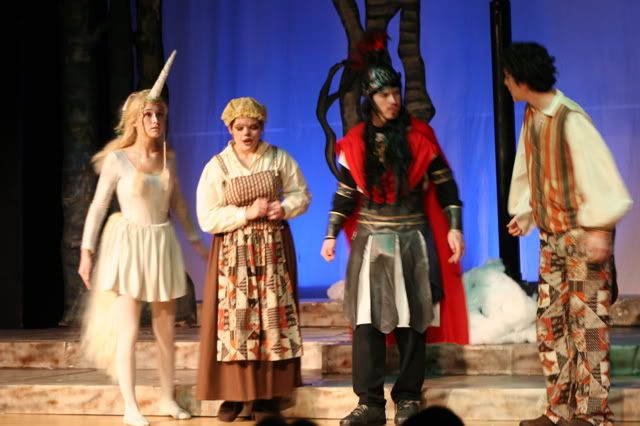
In Narnia: the Musical, a high school production
that I recently directed, I had to come up with a variety
of costume ideas for my non-human characters. I did not want
to use animal body suit or goofy masks in my production, which
I thought would make the show look too cartoony. Instead,
I decided to do representational costumes and make the characters
a mixture of animal and human. I have lumped my two favorites
together in this submission: The Beavers and the Unicorn.
For the Beavers, I took historical colonial costume
patterns (Butterick B3072 and McCalls M4863) and altered them
slightly. I wanted to give the Beavers a peasant feel, and
I used mismatched patterns and prints and earthy/autumn colors.
I also wanted them to compliment each other. I also made two
beaver tails out of brown vinyl and sewed a criss-crossed
black pattern into it.
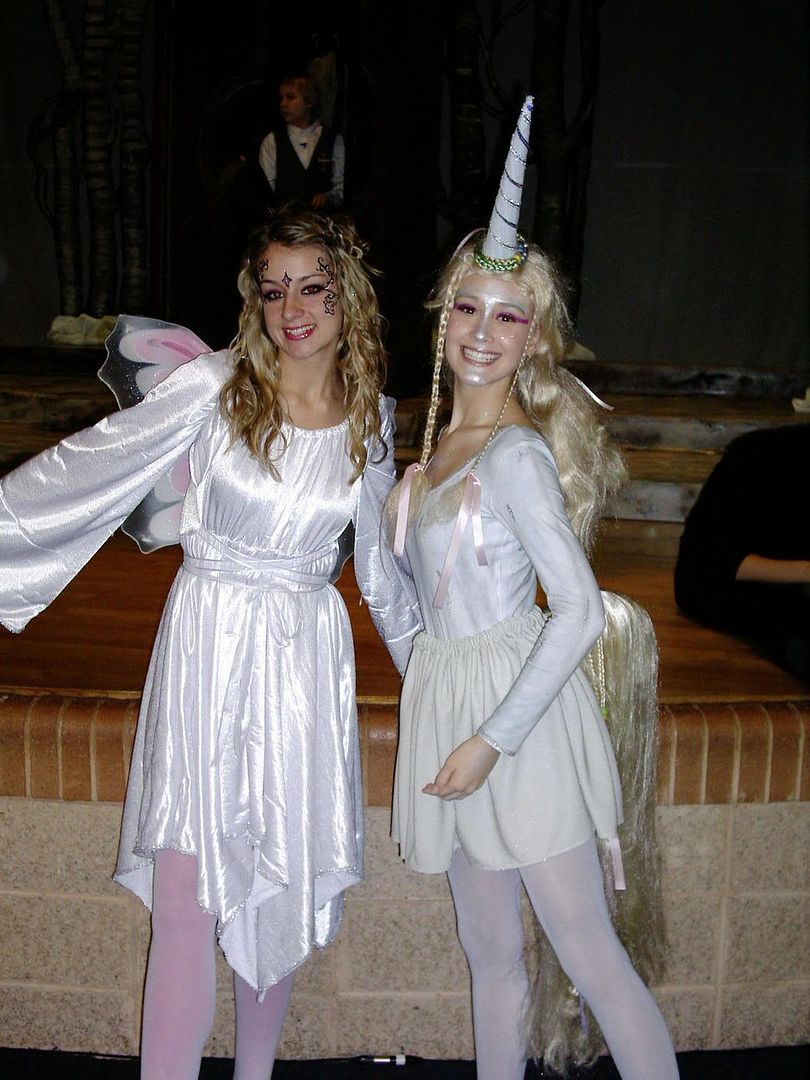
The Unicorn was a lot of fun to design. She had to look graceful,
and the actress was also a dancer in the play, so she needed
something that would move well. I started with making a short,
flowy skirt with some silver fabric. I then too a white leotard
and hose and lightly sprayed them silver to match. The best
part of the costume was the mane and tail, however.
I took a basic blond wig, coarsed it up a bit, added braids,
etc...then I made a horn using styrofoam and I covered it
with ribbon and sequins. I attached this to the wig.
For the tail...interestingly enough, I had just made a Nightcrawler
(the X-Man) costume for myself for Halloween, and I had to
make a tail harness. I used this knowledge to build our Unicorn's.
I used a stiff piece of plasic (from a plasic tub) which was
attaced to a harness made from fabric that could be pull on
like a pair of shorts. To the plastic I attached another piece
to lay the blond wig across (it made the tail stick straight
out like a galloping horse) Our unicorn was able to sit, run,
and dance in that tail! I was proud!
The following link is to my online
photo album, containing my pictures of both the Beavers
and the Unicorn.
Holly
Dryad (Book) Hollylass
All C.S. Lewis says about the hollies in particular is that
the shock-headed hollies themselves are dark, but their wives
are bright with berries, and that wine makes them talkative.
But the way he describes dryads in general, they're clearly
wild-looking people, enough like a person to be mistaken for
human at first, but clearly tree-like as well. So, rather
than simply cover myself in leaves as per the movie's version
of the dryads, I got to work on my own rushed interpretation.
(Apologies for the location of the pictures taken.)
The first step was to draw up sketches of what I wanted to
do, and what I COULD do, given budget and time constraints.
I worked with a base of articles of clothing I had already
made, and did some drawing...
My first sketch, I decided to wear a green cape, because
trees are green. But I decided it would look better with at
least some hair showing. The original idea was to actually
have a whole headpiece trailing down my back, made of holly,
but weight and money constrained that...
The base was discontinued McCalls pattern 2806, in a dark
pink print with roses and leaves printed on. That pattern
is not recommended for a dryad costume, as it's too high-waisted
and not flattering. But it was made for another purpose, and
I was strapped for time, plus, at least it was a plant print!
To give it a bit of greenery, I tied on a sash that was actually
embossed with leaf patterns; ideally it would've been longer,
but again, it was remnants of another costume.
I took a pair of green gauntlets I had from Ren Faire and
put them on my hands, then twisted pieces of holly greenery
(18-inch long stuff, plastic and wire, with leaves and berries)
from Michaels around each to slip around my wrist. To keep
the greenery in place, I twisted a pipe cleaner ring around
each hand's worth of greenery and fixed that to my middle
or ring fingers. Branch hands! If I'd had more time I would
have figured a way to put them on my individual fingers.
The crown was more greenery, twisted into a form to go around
my head, not quite like a wreath, as I aimed to have all the
leaves and berries pointed towards the center of my forehead.
Capes are actually very easy to make. I wore a green velvet
hooded cape, and I'm not sure exactly what the pattern was;
it was made a while ago. I wore it fearing that I'd be waiting
out in the cold for the screening. (And that fear was unfounded.)
I actually a six-foot chain of holly greenery from Michaels
and safety-pinned them to the top of my cape, where the clasp
would be, and let it fall behind my back. Then I took another
chain of holly and attached it to the side of my cape, about
a foot or so down from the very top, to give two layers of
holly. The chains were very good-looking, although it shed
horribly. I made a few of the shed pieces into hair clips.
One key to great costuming is great make-up. Mine wasn't
great but at least it was interesting. In retrospect, I really
should have gone all out and made myself green, but since
I was going to the screening alone I didn't. Instead I gave
myself green eyebrows and put holly berries on my face. (All
the make-up was Ben Nye stage make-up, which I highly recommend;
if you put it on, cover it with powder, and then spray the
clear mint-scented (!) fixant over it, it will stay on until
you scrub it off.)
Anyway, I hope this inspires people to put together a costume,
even if they don't have much time or money!
The
Lamppost Kristen
The outfit is just a pair of long gouchos and a
long sleeve black shirt. For the hat (or Lamppost top) I bought
a lamp shade and cut the outside layer of cloth off and then
put a elasic band on the bottom so it could fot my head and
the stuck some little clip on LED lights for the light that
the Lamppost gives off light. It is a VERY AFFORDABLE costume
to make!
My costume was very easy and in three pieces: the gown, hat
and shirt.
The white shirt was just something I bought at the store
to wear under my gown to give it that middle ages layered
effect. For the hat I took some shiny silver material, (about
5 or 6 inches wide) and sewed it into a tube. After I stuffed
it, I curled it into a ring and hand stitched the ends together.
Over it I drapped a green scarf and pinned it in place. The
gown took the longest but even it wasn't hard. I didn't use
a pattern but the steps are easy. It takes 6 yards of very
wide fabric, (the widest you can get).
1. Fold it in half so it forms a square. The top of the
square along the fold is the top of the dress on the other
end is the bottom.
2. Lay down on the square with your arms stretched out to
the sides and have someone draw your outline on the fabric
with chalk. (make sure you leave a little room for movement
and seam allowance). The sleeves can be shaped any way you
want. Draw straight along the arms for streight sleeves
or do like I did and draw a line down at the elbow for princess
sleeves.
3. draw a half circle where the head will go through, and
you're ready to cut out your dress.
4. When it's cut out, turn the material's right sides together
and pin the sleeves and sides togerther. Sew each side from
sleeve openings to bottom openings as two long seams.
5. Turn it right side out, and hem. Your dress is done!
Make sure you use nice draping fabric for the gown, and don't
cut the neck hole too big or it won't stay up! If I was to
do this costume again I would probably use a narrower tube
for the hat and put some fancy trim around the bottom of my
dress.
I used green fake velvet for my gown and tied some silver
rope from the craft store around my waist for a belt.